608 Como Lake Ave, Coquitlam, Vancouver, V3J0B2
07:00 AM - 09:30 PM
Surprising fact: nearly 60% of Vancouver-area homeowners who upgraded ceiling fixtures cut energy use by one third within a year.
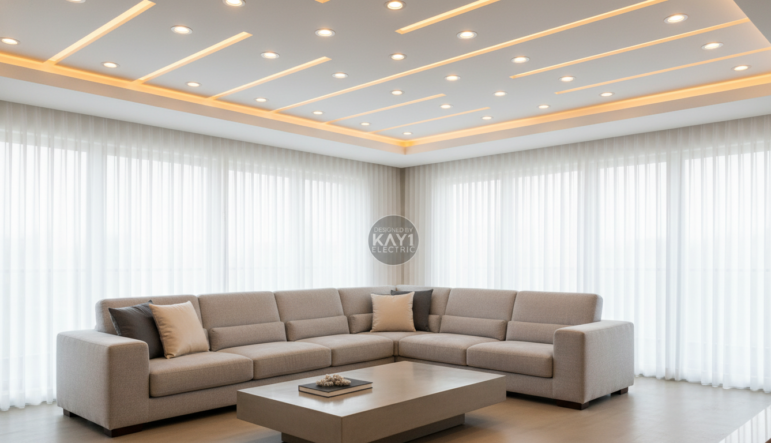
We frame LED Pot Light Installation as one of the fastest ways to modernize your home and boost everyday usability. It brightens cooking zones and creates calm spaces for evenings.
DIY is possible with basic wiring knowledge, but we recommend a licensed electrician if you’re unsure about circuits or junction boxes.
In this guide we will cover layout planning, fixture selection, safety fundamentals and a clear step-by-step overview that fits real Canadian homes.
We’ll clarify terms — pot lights, recessed downlights and led downlights — so you can shop with confidence. We also preview two key decisions: the layout (coverage and spacing) and the electrical approach (circuit capacity and connections).
If you prefer a seamless professional job, call Kay1 Electric LTD at (778) 900-1004. We serve Coquitlam, Vancouver, North Vancouver and West Vancouver.
Upgrading ceiling fixtures now gives Canadian homes a clear blend of savings and modern style.
Energy efficiency: new led downlights use far less wattage per fixture, run cooler, and last years longer than older bulb-based recessed options. That lowers bills and reduces replacement cycles for whole-house projects.
Sleek, low-profile look: these fixtures keep ceilings clean. The minimal trim reduces visual clutter and suits both renovated kitchens and older Vancouver homes seeking a modern finish.
Task areas such as kitchens and work nooks gain the most from concentrated downward light.
Hallways, living rooms and entryways benefit too—well-planned fixtures reduce shadows and spread even ambient lights across a room.
Plan first, cut later. Great results come from layout and coverage decisions, not guessing while cutting holes. The next section explains how many fixtures you need and where to place them.
Start with a simple rule of thumb and adapt it to each room’s needs. Estimate fixture count by dividing the room square footage by 25, then adjust for ceiling height, finishes, and how bright you want the space.
Use the square-foot rule as a baseline. For taller ceilings or brighter task areas, add one or two fixtures. Count the final number before you mark any hole in drywall.
Typical spacing sits around 4–6 feet between fixtures and roughly half that distance from walls. This keeps the ceiling even and avoids dark spots.
Scan for joists and a stud before you place fixtures. Ultra-slim fixtures can sometimes sit under a joist, but most models need clearance. Plan locations to avoid cutting into framing or existing junction boxes.
Map task zones—counters, islands, seating—and add focused fixtures there. Use a lighter grid for general ambient light so you don’t over-illuminate one area.
Need help making the final plan? Call Kay1 Electric LTD at (778) 900-1004 for expert layout advice in Coquitlam, Vancouver, North Vancouver and West Vancouver.
Before you cut any holes, get a clear estimate of time, cost and the skill needed for this project. We give a practical baseline so you can decide whether to DIY or call a pro in Vancouver and nearby areas.
Typical DIY range: most single-fixture retrofits cost about $150–$400 in parts and supplies. Many straightforward jobs finish in roughly a half day.
| Factor | Effect on cost | Typical impact on time |
|---|---|---|
| Easy retrofit, single box | Low ($150–$250) | Half day |
| Multiple fixtures / long runs | Medium ($250–$400+) | Full day or more |
| Old wiring / extra junction capacity | High (variable) | Extended – may need permit work |
We define this work as intermediate: you should be comfortable using a drill, cutting clean drywall, making safe wire connections, and testing circuits. If that sounds uncertain, hiring Kay1 Electric LTD avoids rework, flicker or code issues. Call us at 7789001004 for reliable service in Coquitlam, Vancouver, North Vancouver and West Vancouver.

We help you select products that fit tight ceilings and meet performance needs. Start by weighing ultra-slim panels against traditional recessed housings.
Ultra-slim models, like Halo by Eaton, offer about 1025 lumens and a roughly 1/2‑inch profile. They work well when framing limits depth.
Traditional housings give more wiring room and trim options. They suit thicker ceilings and retrofit scenarios where attic access is easy.
Lumens measure perceived brightness. Use lumens not watts to decide how bright a room should be.
Example: 1000–1200 lumens suits a kitchen task area, while 400–800 lumens is fine for living rooms.
Warm tones feel cosy. Neutral tones work for general rooms. Cooler tones help task-focused zones.
If you want dimming or selectable temperatures, confirm the driver and switch compatibility first. Choose IC-rating for insulation contact and wet-rating for bathrooms or exterior soffits.
| Option | Profile | Typical lumens | Best use |
|---|---|---|---|
| Ultra-slim panel (Halo) | ~1/2 in. | ~1025 | Tight ceiling cavities, modern look |
| Traditional recessed housing | Deeper (varies) | 800–1500 | Retrofits, attics with space |
| Selectable colour / dimmable model | Varies | Variable | Flexible mood and task control |
Need help selecting the right product for your home? Call Kay1 Electric LTD at 7789001004 for guidance in Coquitlam, Vancouver, North Vancouver and West Vancouver.
Preparing tools, templates and wiring in advance saves time and avoids costly mistakes. We give a concise, job-ready checklist so you don’t run back to the store after the ceiling is open.
Pro tip: bring basic PPE—eye protection and a dust mask—and a spare roll of wire and extra connectors. If a junction box accepts only two cables, plan for an additional box or reroute runs.
If you want expert help or parts verified for Vancouver homes, call Kay1 Electric LTD at 7789001004. We serve Coquitlam, Vancouver, North Vancouver and West Vancouver.
Safety starts long before any wires are exposed—proper prep keeps people and homes safe.
Turn off power at the correct breaker and lock it out if possible. Then verify voltage with a reliable tester at every junction you will touch. Never assume power is off.
Live carries current to the fixture, neutral completes the circuit, and ground protects people by sending faults away. Match colours and labels carefully. Make sure ground connections are secure; they are a safety essential, not optional.
Use the 80% guideline: treat a 15A circuit as ~1400W usable and a 20A circuit as ~1900W usable. That margin prevents nuisance trips and overheating.
| Circuit | Usable watts (80%) | Example 8W fixtures possible |
|---|---|---|
| 15A | 1400 W | ~175 fixtures |
| 20A | 1900 W | ~237 fixtures |
| Typical retrofit note | Account for other loads | Reduce fixture count accordingly |
Assess cable counts in each junction box; add boxes if capacity is exceeded. Before the next step, double-check breaker ID, wire matching, and tighten all connections. If you have doubts, call Kay1 Electric LTD at 7789001004 for safe, code‑compliant work in Coquitlam, Vancouver, North Vancouver and West Vancouver.
We walk you through the full wiring and mounting sequence so each step flows into the next without surprises.
Mark carefully first. Measure and place fixture centres, then use the manufacturer template to trace each hole for clean edges. Use a stud finder to avoid joists and keep layout balanced.
Cut each hole with a drywall saw or circle cutter. Keep cuts tidy so trims sit flush. If a hole is too large, patch before proceeding to avoid rattle or gaps.
Run 14/2 cable between locations. When you have attic access, fish wires in from above for easier routing.
If there is no attic, fishing wires from the next opening or a soffit may be needed. Use a fish tape and flexible drill bit to pass cable through framing.
Many modern units include an integrated junction/driver box. Use the manufacturer diagram for colour-coded leads.
Connect power in and power out to daisy-chain multiple fixtures. Use approved connectors or pigtails, and maintain a secure ground at every junction.
Seat each fixture using spring clips or the supplied mounting method. Snap or screw on trim for a finished look.
Before restoring power, verify every junction box has a cover and no conductors are exposed. Turn on the breaker and test each light for consistent operation.
| Step | Action | Tip |
|---|---|---|
| 1 | Mark locations, use template | Measure twice; avoid joists |
| 2 | Cut holes | Keep edges crisp for trim fit |
| 3 | Run & fish wires (14/2) | Attic access simplifies routing |
| 4 | Connect in junction box, daisy-chain | Follow manufacturer wiring diagram |
| 5 | Secure fixture, install trim, restore power | Cover junctions, test operation |
Need help? If any step feels uncertain, call Kay1 Electric LTD at 7789001004 for fast, code‑compliant service in Coquitlam, Vancouver, North Vancouver and West Vancouver.

Each ceiling type demands its own approach to hole placement, support and wiring. We explain practical differences so you don’t assume every job is a simple cut‑and‑clip task.
For drywall, start with the manufacturer template and mark centres carefully. Cut clean holes and avoid studs and joists.
Plan attic access to run cable and place the junction box where you can reach it later. Secure the fixture to framing or a brace for firm support.
Drop grids carry weight differently. Rely on the grid for basic support, but use additional bracing for heavier fixtures.
Protect wiring with conduit or discrete runs above the tiles. Keep access clear so you can service the box without removing panels.
Soffits resemble drywall installs but need outdoor‑rated fixtures when exposed to moisture. Choose wet‑ or damp‑rated models and seal penetrations to prevent drafts and rot.
Temperature swings can shorten lifetime if fixtures are not rated for the location, so select products suited to exterior use.
Choosing the right switch or dimmer changes how a room feels at different times of day. Good controls give you task-level brightness for cooking and softer tones for evenings.
Many downlights work fine on a basic on/off switch. For dimming, pick an LED-compatible dimmer to avoid poor performance.
We recommend testing one circuit first. That saves time and avoids swapping parts later.
Flicker often comes from mismatched dimmers or unstable voltage from poor wiring. It can stress electronics and shorten lifespan.
| Checkpoint | Why it matters | What to verify |
|---|---|---|
| Dimmer type | Matches driver | Confirm dimmer is LED-compatible |
| Driver rating | Handles load | Check minimum/maximum load |
| Voltage stability | Prevents flicker | Measure voltage under load |
If you want help matching controls to fixtures, call Kay1 Electric LTD at 7789001004. We serve Coquitlam, Vancouver, North Vancouver and West Vancouver.
Bathrooms and shower zones demand special attention because moisture changes how fixtures perform over time. We focus on practical steps you can take to protect wiring, keep ceilings intact, and meet local code.
Showers are not standard locations. Choose wet-rated fixtures when a fitting sits directly over a shower or tub. Wet-rated means the unit resists water exposure and keeps electrical parts sealed.
Place fixtures for even coverage, low glare, and away from direct spray where possible. Check the product label for the rating and confirm the junction box design suits the space.
Fire-rated pot options are a code-minded upgrade. They help seal the ceiling assembly so fire resistance remains intact between floors or units.
Verify the fixture’s fire rating on the documentation and confirm the junction box meets listing requirements. When in doubt, call us—these areas often need a licensed electrician to avoid safety and insurance risks.
Need install help or a safety check? Call Kay1 Electric LTD at 7789001004 for service in Coquitlam, Vancouver, North Vancouver and West Vancouver.
A clear way to decide: if it’s a simple swap on an existing run, a careful diy approach can save money. If you need new runs, multiple junction points, or can’t verify voltage and grounding confidently, call us.
Look for these red flags before you proceed. If any apply, you likely need install support rather than a weekend diy.
We help you choose the right way forward based on risk and complexity. For simple swaps we guide the next step and offer parts advice. For full system work we deliver tidy layouts, approved wiring practices, compatible dimmers, and a finished look that matches your plan.
Ready for the next step? Call Kay1 Electric LTD at (778) 900-1004 to book service in Coquitlam, Vancouver, North Vancouver, and West Vancouver. We’ll assess the project, confirm code needs, and schedule a fast, professional job you can trust.
Good results come from sequence: plan, verify circuits, then make each opening with confidence.
Start by finalizing your lighting layout and confirming circuit capacity. Only cut a hole after you know access and spacing are right.
Always shut off power, test voltage, tidy wire runs, and close every junction box before energizing a circuit. These steps protect you and your home.
Choose quality led fixtures and compatible dimmers to reduce flicker and keep consistent light performance. Expect typical diy time to be about a half day and costs around $150–$400, varying with scope.
If wiring, junctions or load calculations feel uncertain, the safest way is to call a licensed electrician. Call Kay1 Electric LTD at 7789001004 for expert help in Coquitlam, Vancouver, North Vancouver and West Vancouver.